
Windows Was Unable to Complete the Format
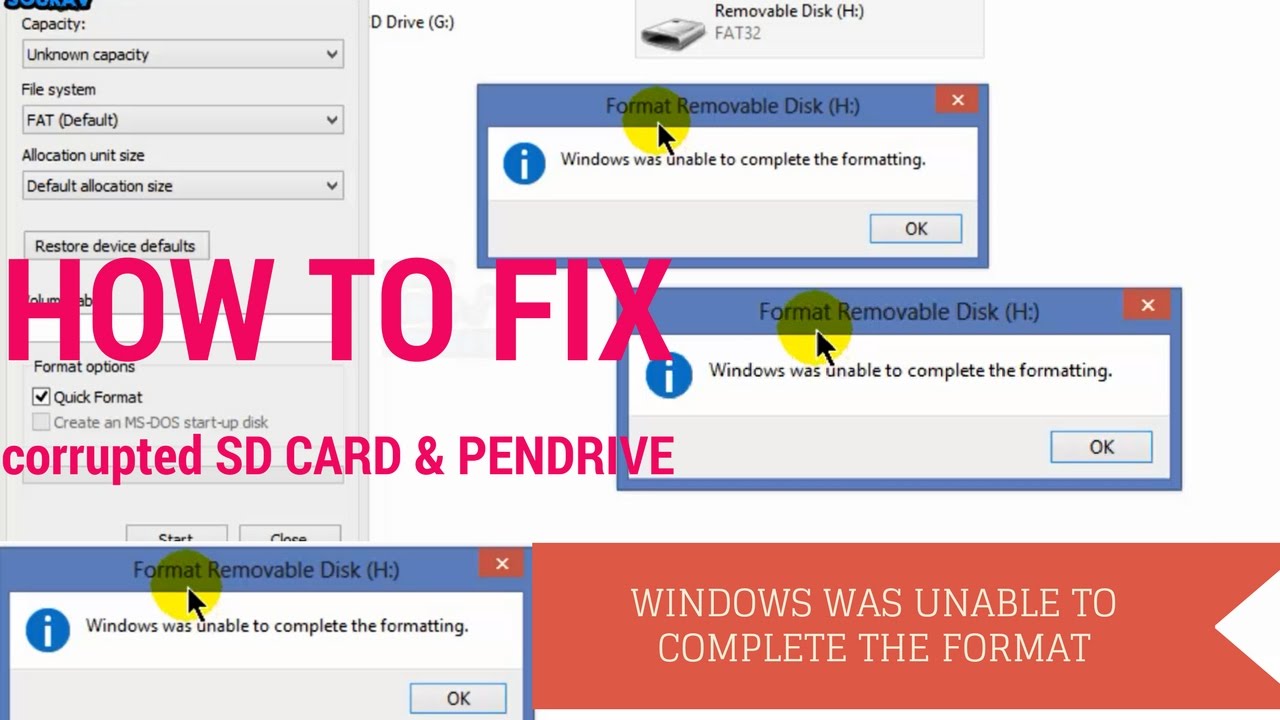
Disk formatting is quite efficient in cleaning up disk partition files, and is usually adopted by us when we are going to emptying an internal hard drive or a removable disk. However, sometimes when we carry out formatting on a removable disk, Windows gives us a prompt saying "Windows was unable to complete the format", just as shown in the figure below.

More Details on This Issue
Windows was unable to complete the format always happen on USB flash drive or SD card. Before we come across this error message, another phenomenon is that when we trying to open the removable disk, Windows tells that "you need to format the disk in drive N before you can use it, do you want to format it?"

At this time if we ignore this message, then we see "[drive letter] is not accessible. The volume does not contain a recognized file system."

But if we accept the suggestion, then we see "Windows was unable to complete the formatting" soon.

Possible Reasons for Windows Was Unable to Format Pen Drive
Before we get to the solutions, we would like to tell the possible reasons for this error. In this way you may avoid the possibility of getting such error. Normally, five factors may lead to Windows was unable to complete the format:
1.The Drive Is Write Protected
Since formatting is a kind of writing operation, you need to remove the write protection before formatting it. How do you know it is write protected? Well, copy something to it. If you see the following message: "The disk is write protected. Remove the write protection or use another disk", then it is write protected indeed.
2.The Drive Has Bad Sectors
Files stored on hard drives usually occupy many sectors. Sectors are the smallest units for data storage. If a sector is damaged and cannot be read or write, it is called bad sector. Bad sector can affect the formatting operation as well as the data recovery operation. What caused bad sectors? Bad quality, excessive defragmentation, or falsely unplug the USB drive, etc.
3.The Drive Is Physically Damaged
Physical damage is another important reason that leads to storage device inaccessible, so Windows requires formatting it. Professional repair center can repair the bad spots but the cost is not low at all. So you may consider changing another removable disk.
4.The drive Suffers from Virus Infection
Since USB drives are often carried by users and are connected to various computers, they are more likely to get virus infection than other hard drives. The virus often fills the USB drives with dangerous files and makes them out of service.
5. The Drive Is Empty
The last reason for Windows was unable to format removable disk is that there is no partition on the hard drive. However, you will find there is a drive letter for it. Thus you are able to see the removable disk in Disk Management and then receive the formatting suggestion. As formatting is based on partition instead of unallocated space, Windows is unable to complete the formatting.
Best Solutions for Windows Was Unable to Format Removable Disk
If your USB drive can't be formatted properly and reports "Windows was unable to complete the format", please do not abandon the drive before you have tried the solutions below to fix this issue. However, please note that all these solutions will not work if the USB drive is physically damaged.
 Attention:
Before you start, please check your USB flash drive in Disk Management and see how the removable disk is revealed: is there a partition on it OR is the partition showing RAW file system? You should carry out the correct solution according to the real situation.
Situation 1: The Drive Has No Partition
If there is no partition on the removable disk, only unallocated space is presented, then you will need to recreate a partition on it. There are three ways for you to create new partition.
Solution ①: Use MiniTool Partition Wizard to Create
MiniTool Partition Wizard is an all-in-one solution for disk/partition management in Windows Vista/XP/7/8/10. It offers powerful solutions to deal with all kinds of hard drive issues like resize partition, rebuild MBR, convert file system, copy disk/ partition, and so on. Its concise interface and user-friendly operations has helped million of users manage their hard drives better. When it comes to creating partition, do the followings:
Step 1: Launch MiniTool Partition Wizard Free Edition and enter its main interface. Then click on the removable disk and choose "Create Partition".

Step 2: In the new presented window, specify the details of the new partition like Partition Label, Partition Type, File System, Drive Letter, and so on. Then click "OK" to continue.

Step 3: Back to the main interface and you will see there is a partition on the removable disk. But this is just a preview. If you want to make some changes, you can click "Undo" or "Discard" to recreate partition. If you confirm the change, just press "Apply", then the new partition is created.

Maybe such brief introduction cannot help you understand this tool as well as its powerful function clearly. Want to know more, the following video is worth recommending.
Download Now
Solution ②: Use Disk Management to Create
Disk Management is also a good solution to manage partitions and disks for Windows computers. With a few simple clicks, you are able to create new volume on the removable disk that Windows cannot format.
Step 1: Right click "My Computer", select "Manage", and then "Disk Management" OR run "DISKMGMT.MSC" to launch Disk Management. Then right-click on the removable disk and choose "New Simple Volume".

Step 2: In the new presented window, follow the guidance to specify the volume size, assign drive letter, format partition to finish partition creation.

Solution ③: Use Command Line to Create
Another reliable solution to create a partition based on Windows is command line. It looks like this method is complicated to common users, but it is not always in fact. Please follow the steps below and check whether it can get everything done.
Step 1: At Windows Start menu, run "Diskpart".

Step 2: In the command prompt window, enter the following commands in order (each should end up with Enter key):
"list disk";
"select disk n" where n is the disk number of the removable disk;
"clean";
"create partition primary"
"format FS=FAT32 quick" or "format FS=NTFS quick";
"assign letter N:" where N: can be other drive letter not occupied currently;
"exit".

When any of the three solutions is carried out, the removable disk can be used normally.
Tweet Your New Skill
Situation 2: The Drive Has RAW File System
RAW drive is a hard drive/partition which has not been formatted with the one of the following file system: FAT12/FAT16/FAT32 or NTFS. RAW drive can be caused by many reasons like virus infection, format failure, power outages, unrecognized file system, etc. To fix RAW file system, you can do one of the following solutions to reformat the removable disk.
Attention:
You should know that formatting will lead to data loss at the same time. Please refer to How to Recover Data from RAW Drive to get solution.
Solution ①: Use Partition Wizard to Format
Step 1: Launch MiniTool to its main interface. In the middle pane you can see the RAW drive is shown as "Unformatted". Now click on this partition and choose "Format Partition".

Step 2: In the new presented window, confirm the Partition Label, File System, Cluster Size and click "OK" to continue.

Step 3: See the partition on the removable disk will be changed. Now click "Apply" to save the changes.

Solution ②: Use Disk Management to Format
Step 1: Go to Disk Management and you can see the USB drive is listed on the middle panel.
Step 2: Right click the USB drive and select "Format" option to perform a quick format.

Step 3: In the new presented window, confirm the volume label, file system, allocation unit size, and choose whether to perform a quick format, then click "OK".

Step 4: Disk Management will warn you that "Formatting this volume will erase all data on it. Back up any data you want to keep before formatting." If you already have a copy of the hard drive and want to continue, click "OK", otherwise choose "Cancel" to prepare data rescue. Once formatting is done, the pen drive is ready for use.

Solution ③: Use Command Line to Format
Sometimes Disk Management is not as helpful as command prompt. Although using command prompt may seem complicated, it still deserves a trying.
Step 1: Run "cmd" at Windows Start menu.

Step 2: Type "format N:/fs:FAT32" (N: refers to the target partition, and FAT32 can be replaced by NTFS). This process may last long.

If all these solutions fail, you should consider whether there is something wrong with the removable disk. You should carry out virus checking and killing, you should check and repair bad sectors or you can check whether the hard drive is write protected and remove the protection. Finally, repeat these solutions.
How to Transfer Data from USB Drives We Cannot Access
Remember all data will get lost once we perform "Format"? So it is significant to backup the important data in the USB drive if it holds important documents. But since we cannot access the hard drive and Windows keeps asking us to format it, we have to rely on data recovery software to do this job. Here MiniTool Power Data Recovery is strongly recommended.
Use MiniTool Power Data Recover to Rescue Data
MiniTool® Software Ltd. has developed professional data recovery software for both Windows and MAC users to resolve kinds of data recovery issues. As we are talking about Windows was unable to format pen drive, MiniTool Power Data Recovery which works on Windows Vista/XP/7/8/10 should be the right choice.
Step 1: Make sure Windows can recognize the USB drive and run MiniTool Power Data Recovery. On the main interface, choose Damaged Partition Recovery.

Step 2: Select the USB drive to make a Full Scan.

Step 3: After the scanning, choose the files you want to recover and select a destination path. We suggest selecting any location except the original drive, for fear that the recovery result is not satisfying. Then just wait for the success.

Attention:
MiniTool Power Data Recovery Free Edition has a 1GB limitation on data recovery. Thus, if you have got more data to be recovered, you will need to upgrade the Free Edition to a Paid Edition.
What We Learned
USB flash drives or memory cards are useful storage devices in modern society, as they are capable of storing a large amount of data and are easy to carry and transfer data. USB drives are important to us and it's necessary to learn skills to solve the common issues occurred on removable disks like File or Directory Is Corrupted and Unreadable. So please be more careful when we use USB flash drives to avoid some errors. If Windows was unable to format pen drive happens, try solutions by yourself before you give up.
Now It's Your Turn
Typical Errors When Windows Is Unable To Format USB
Depending on the operating systems (Windows 10, 8, 7, Vista, XP) you are using, the error messages may vary from case to case. Here are a few common ones:
- The disk is write protected.
- The USB disk is not formatted, do you want to format it now?
- The USB drive is not initialized.
- The operation did not complete because the media is write protected.
- There is no disk in the drive. Insert the disk and then try again.
- Windows refuses to format your USB key or access files.
- Other force format error messages.
The possible causes for those formatting errors also vary a lot. For example, the flash drive is corrupted after improper ejection or an unexpected PC shutdown during data transfer. There might be compatibility issues between your flash drive and the PC.
Another common reason for that is file system error. For example, normally a new flash drive is initiated with FAT-32. It’s possible that you (or the person who uses it) might have reformatted it into NTFS or another file system.
Why file system matters?
You might wonder. We’d like to use an analogy a reader shared with us earlier.
A flash drive is essentially like a book, the data is the words in the book, the format is the paper that the words are printed on – different book publishers use different kinds of paper.
Now you understand. Let’s go back to the topic.
Before Formatting Your USB Drive
Make sure that you’ve already backed up the data stored on your flash drive. If you haven’t done so and the files stored inside are important to you, try using a data recovery software to see if it helps. Just connect your USB drive to the PC, then let a recovery program scan your USB drive to seek any recoverable items.
Also, if you happen to have access to another computer, the first attempt you should take is try inserting the USB drive to that PC and then see if the drive can be accessed or formatted successfully. Sometimes this helps clear the compatibility or buffer issues. If that doesn’t help, follow the guide below.
How To Fix It When Windows Is Unable To Complete The Format
Simply put, you go to Disk Management and re-initiate the volume. Here’s how to do it:
- Insert your flash drive into a PC.
- Move the cursor to the bottom left corner. Right-click on the Windows icon.
- Select Disk Management.
- Highlight the disk your flash drive represents, right click and choose New Simple Volume.
- Now select the formatting options, make sure under File System you choose FAT-32 or exFAT.
- Click “Next” to complete the rest procedure.
If this doesn’t work out, use the command line to initiate the drive. This video has more:
How To Format Your USB When Windows Says Disk Is Write Protected
Note: our PC is running Windows 10 thus all the screenshots below are taken based on Windows 10. If you’re on Windows 8.1, 7, Vista, or XP, they will look slight different.
Step 1: In the search bar, type “regedit” and click the regedit app icon to run it.

Step 2: In Registry Editor, go to HKEY_LOCAL_MACHINE > SYSTEM > CurrentControlSet > Control.

Step 3: Right-click Control folder, select New > Key.

Step 4: Now rename the New Key #1 folder into StorageDevicePolicies.


Step 5: Right-click on StorageDevicePolicies folder, select New, and QWORD (64-bit) Value if your PC is running with a 64-bit version, or DWORD (32-bit) Value if it’s with 32-bit.

Hint: see this Microsoft article to check whether your computer is running a 32-bit version or 64-bit version.
Step 6: Now rename the New Value #1 folder into WriteProtect.


Step 7: Double click the WriteProtect folder, change the Value data: into “0” and Base to “Hexadecimal”, click “OK.”

Step 8: Close RegEdit by clicking the “X” icon.

Step 9: Open “This PC” (Windows 10) or “My Computer” (Windows Vista/XP), and refresh it 5 times without doing anything to your USB drive, and properly eject the flash drive.
Step 10: Now plug your USB drive again into your computer and format it to exFAT instead of FAT32.
Solution 3: Use PartitionGuru
If the first two methods do not work as expected for you then try to fix the issue with third party tool PartitionGuru. It's effective disk tool and partition manager and file recovery tool, which can check and repair bad sectors for local and USB drive, format partition or HDD, recover formatted and deleted data, etc. As the Windows can't format USB drive issue might be caused by bad sectors, we can check and repair bad sector for flash drive with PartitionGuru ahead of trying formatting.
Step 1
Run PartitionGuru and see its main interface listing detailed information of internal and external drives and their partitions.
Run PartitionGuru and see its main interface listing detailed information of internal and external drives and their partitions.
Step 2
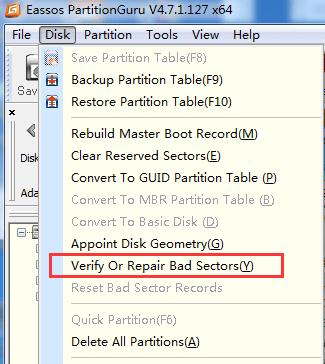
Click the problem USB drive and menu "Disk" to select "Verify or Repair Bad Sectors".
Click the problem USB drive and menu "Disk" to select "Verify or Repair Bad Sectors".
Step 3
It displays cylinder conditions with colored blocks, such as good, severe, damaged, etc. When bad sector checking completes, it reports how many bad sectors it finds out. Then click "Repair" button to repair bad sectors.
It displays cylinder conditions with colored blocks, such as good, severe, damaged, etc. When bad sector checking completes, it reports how many bad sectors it finds out. Then click "Repair" button to repair bad sectors.
Step 4
Select the USB drive and click "Format" button to format the flash drive.
Select the USB drive and click "Format" button to format the flash drive.
Note:
Repairing bad sectors damages files stored on and near bad sectors, thus if files on the drive are important to you, you need to backup or recover data first.
Repairing bad sectors damages files stored on and near bad sectors, thus if files on the drive are important to you, you need to backup or recover data first.

File recovery from USB drive that can't be formatted
Such kind of problem is very common to those who often works with USB drive, and it might end up with losing all files and folders. However, you are able to recover lost data provided that USB devices are not totally dead. One thing you should keep in mind is that you might not be able to recover data completely if the drive is formatted or repaired. Thus file recovery should be performed first if the problem drive contains valuable files which haven't been backed up.
Apart from checking and repairing bad sectors, PartitionGuru is able to recover lost files that are deleted, formatted, reformatted or corrupted from local or USB drives. File recovery process is read-only and doesn't do harm to original data and storage. Let's see how to recover files from USB drive.
Step 1
Connect the USB drive to computer and run PartitionGuru. Then you can see your USB flash drive or SD card is listed on the interface.
Connect the USB drive to computer and run PartitionGuru. Then you can see your USB flash drive or SD card is listed on the interface.
Step 2
Click on the drive and the button "File Recovery". Select "Complete Recovery" option and check the box "Search for Known File Types" on the Recover Files window, then you can start file scanning. This recovery tool allows users to preview files while file scanning is on-going as screenshot below:
Click on the drive and the button "File Recovery". Select "Complete Recovery" option and check the box "Search for Known File Types" on the Recover Files window, then you can start file scanning. This recovery tool allows users to preview files while file scanning is on-going as screenshot below:

Step 3
Select and save desired files to a secure location. When file recovery completes, you can try methods mentioned to format or repair it.
Select and save desired files to a secure location. When file recovery completes, you can try methods mentioned to format or repair it.
Conclusion
These are best methods to fix Windows was Unable to Complete the Format issue at present and most of times they work well. You can try these solutions above one after another and find the one works for you. If none of them works, then the USB drive might be damaged permanently and there is no way to fix it.
Comments
Post a Comment